 Save
Save I discovered the magic of a well-arranged cheese board at a gallery opening in the city, where an Art Deco exhibition had me staring at photographs of 1920s skyscrapers long after the wine was gone. The geometric precision of those building facades stuck with me, and weeks later, I found myself arranging slices of cheddar on a platter in overlapping arcs, trying to capture that same architectural drama. What started as a silly experiment became my favorite way to present cheese to people—suddenly it wasn't just snacking, it was theater.
The first time I served this to actual people, a friend leaned over the platter and said it looked too beautiful to eat—then immediately contradicted herself by eating four slices of Gruyère in a row. That's when I realized the real power wasn't the Deco inspiration, it was giving people permission to enjoy cheese without guilt, arranged like it mattered enough to plan.
Ingredients
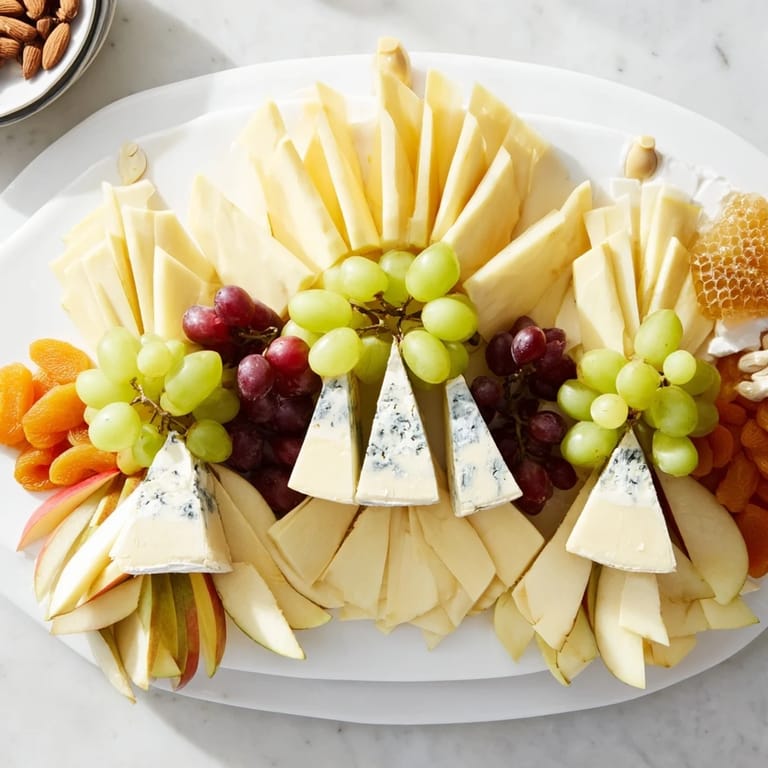
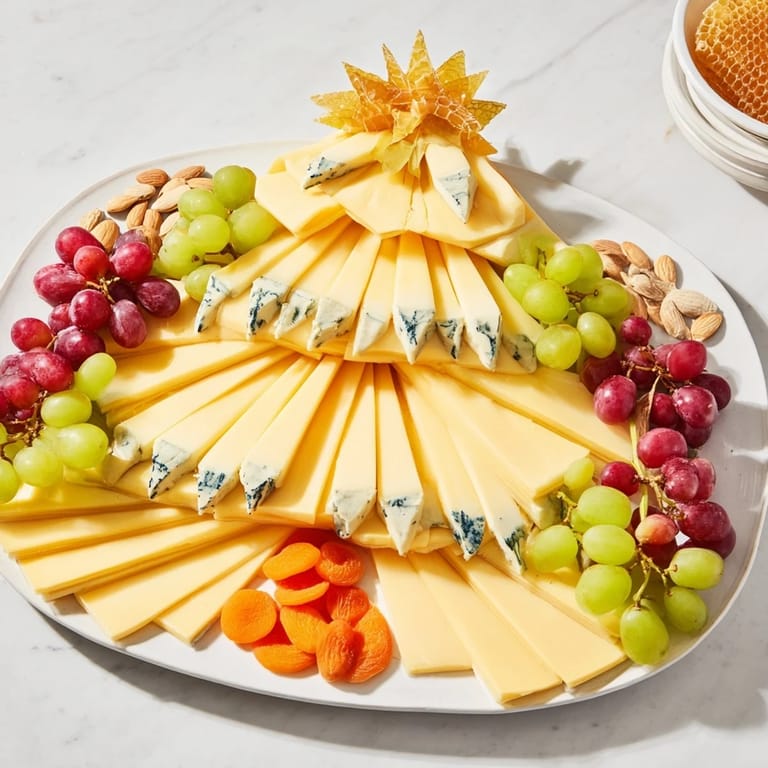
- Aged cheddar, Gruyère, and Manchego (150g each, sliced thin): These three cheeses are your architectural backbone—the aged ones have enough texture to slice cleanly without crumbling, and they hold those fan shapes without flopping around.
- Creamy brie (120g): The soft anchor that sits at the base of each arch; it spreads slightly under its own weight, which actually helps it look intentional and grounded.
- Blue cheese (100g, triangular cuts): The sharp punctuation mark at the top; cut into small triangles so the blue veining shows and creates visual interest at the peaks.
- Green and red grapes: These fill the gaps and prevent the arrangement from looking sparse; the color contrast makes the geometric patterns pop.
- Pear and apple slices: They oxidize slightly, which sounds bad but actually adds a gentle browning that echoes Art Deco's earthy palette; toss them in a tiny bit of lemon juice if you're fussy about it.
- Roasted almonds and dried apricots: Scatter these between the arches as textural breaks; they also give people something to nibble that isn't cheese-on-cracker.
- Honeycomb or honey: A drizzle near the brie adds richness and a little sweetness that balances the sharpness of aged cheese.
- Baguette slices and assorted crackers: Keep these on the periphery so people can load up without dismantling your careful arrangement.
Tired of Takeout? 🥡
Get 10 meals you can make faster than delivery arrives. Seriously.
One email. No spam. Unsubscribe anytime.
Instructions
- Set your stage with three overlapping arches:
- Lay your large board in front of you and imagine three invisible arches radiating from the center. Start with your aged cheddar, shingling each slice over the next at a slight angle to create that fan effect—it takes maybe a minute per arch once you understand the rhythm. The key is that each slice overlaps just enough to hold its neighbor in place without looking cramped.
- Build the base with brie wedges:
- Place your brie wedges at the bottom-center of each arch, positioned as if they're supporting the structure. The soft cheese will settle slightly, which is perfect because it looks intentional and architectural.
- Crown each arch with blue cheese:
- Position your blue cheese triangles at the top-center point of each arch, creating those sharp peaks that echo Art Deco skyscraper tops. This is where you get to be a little dramatic.
- Fill the negative space with fruit and color:
- Nestle grape bunches, pear slices, and apple slices into the areas between the arches. Don't overthink this part—you're adding visual relief and color contrast, not creating a second masterpiece.
- Scatter the textural accents:
- Distribute your roasted almonds and dried apricots around the platter in clusters rather than randomly scattered dots. Clusters feel intentional; random dots feel accidental.
- Add the honey moment:
- Drizzle honeycomb or honey near one of the brie wedges so it catches light and adds a final luxe touch. This is pure theater, but it works.
- Position your vehicles for consumption:
- Arrange baguette slices and crackers along the sides of the platter where people can grab them without reaching across your arches and disrupting the display.
- Know when to serve:
- Bring it to the table immediately if you want everything at optimal temperature, or cover it and chill for up to an hour if you're building it ahead. The cheeses will firm up slightly when chilled, making them easier to slice.
 Save
Save What I love most about this platter is watching people's hesitation disappear the moment they understand they're allowed to take what they want without ruining the design. That shift from 'it's too beautiful to touch' to 'okay I'm having three kinds of cheese' is when it stops being a display and becomes a gathering.
Cheese Selection and Swaps
The beauty of this arrangement is that the geometry works with almost any firm to semi-firm cheese you can slice cleanly. I've used Comté for earthiness, aged Gouda for sweetness, and even Emmental when I wanted something milder. The key is avoiding fresh cheeses that won't slice (save those for a different board) and picking cheeses with enough personality that they taste like they belong in the same conversation. Temperature matters here—pull your cheeses out about 15 minutes before you start slicing so they're cool but not cold and brittle.
Making It Your Own
This isn't a rigid formula, it's a framework. I've made versions with figs instead of apricots, marcona almonds instead of roasted, and even a completely vegan iteration using plant-based cheeses that sliced surprisingly well. The architecture stays the same; the details become yours. Think about what cheeses you actually love eating together, what fruits are in season, what crackers you'd reach for first—then build from there instead of following every ingredient exactly.
Timing and Service Secrets
The 25-minute window is real if you've prepped your ingredients and have decent knife skills, but don't stress if it takes you 40 minutes the first time. The arrangement matters more than speed. If you're building this for a party, slice and prep everything the morning of, then do the actual arranging 30 to 60 minutes before guests arrive—this gives you calm hands and the cheeses a chance to settle without getting warm.
- Pair this with something crisp and celebratory—a dry Champagne or Riesling makes the whole thing feel intentional and special.
- If you're serving this buffet-style, position it somewhere guests will find it before the main event, not after, so people actually eat it when the cheeses are at their best.
- Have small plates nearby even though people will eat standing up anyway; it's the thought that counts.
 Save
Save This platter has become my solution for 'I want to entertain but I don't want to cook,' and it never fails to make people feel like they're part of something a little more intentional than just snacking. There's something about giving cheese the respect of real arrangement that makes the whole moment feel better.
Recipe FAQs
- → What cheeses are best for this platter?
Aged cheddar, Gruyère, Manchego, creamy brie, and blue cheese offer a pleasing mix of textures and flavors that complement the Art Deco design.
- → How to create the arch shapes with cheese?
Slice cheeses thinly and arrange them in overlapping tiered fans on a large platter to form symmetrical arches inspired by skyscraper lines.
- → Can I prepare this platter in advance?
Yes, you can assemble and cover it, then chill for up to one hour before serving to keep cheeses fresh.
- → What accompaniments enhance the cheese selection?
Seedless green and red grapes, sliced pear and apple, roasted almonds, dried apricots, and honeycomb add complementary textures and flavors.
- → Are there variations for dietary preferences?
Swap traditional cheeses for plant-based options and omit honey for a vegan-friendly arrangement without sacrificing visual appeal.