 Save
Save My sister called three weeks before Mother's Day in a panic—she'd promised to bring dessert to the family brunch but had no idea what to make. I suggested this cake almost on impulse, remembering how my mother always lingered over the bakery window displays, especially drawn to anything pink and delicate. What started as a quick phone call turned into us baking together that Saturday, laughing at the buttercream splatters and marveling at how the ombre effect came together more beautifully than either of us expected. That cake became the centerpiece of the whole celebration, and I've made it countless times since.
The first time I served this at a dinner party, I was nervous about the presentation because I'd only practiced the ombre effect once before. As I set it on the table and my guests gasped, I realized the imperfections—the slightly uneven color transitions, the way one side was smoother than the other—actually made it feel homemade and genuine. That's when it clicked: this cake doesn't need to be flawless to be beautiful.
Ingredients
- All-purpose flour (2 ½ cups): Measure by spooning into your measuring cup and leveling off—scooping directly from the bag compacts it and throws off your ratios.
- Baking powder (2 ½ tsp): Double-check the expiration date because old baking powder won't give you that lift, and you'll end up with a heavy, disappointing cake.
- Unsalted butter (1 cup plus 1 ½ cups for buttercream): Room temperature is non-negotiable—cold butter won't cream properly, and you'll struggle to incorporate air into the batter.
- Granulated sugar (2 cups): This sweetness is the backbone of the sponge, so don't be tempted to reduce it thinking you're being healthy.
- Large eggs (4): Room temperature eggs blend smoothly into the batter without shocking the temperature of your mixture.
- Pure vanilla extract (1 tbsp plus 2 tsp): Invest in real vanilla—the imitation kind leaves a slightly chemical aftertaste that undermines all your other efforts.
- Whole milk (1 cup): The liquid component that keeps the sponge moist and tender throughout baking.
- Powdered sugar (5 cups): Sift it before measuring to remove lumps that can create a grainy buttercream texture.
- Milk or heavy cream (2-3 tbsp): Heavy cream makes the buttercream slightly richer, while milk keeps it a touch lighter—your choice depending on the weather and your mood.
- Pink gel food coloring: Gel is essential because liquid coloring thins out your buttercream, forcing you to add more powdered sugar to compensate, which throws off the whole balance.
- Edible flowers: Violets, pansies, and rose petals work beautifully—just make sure they're grown without pesticides if you're actually eating them.
Tired of Takeout? 🥡
Get 10 meals you can make faster than delivery arrives. Seriously.
One email. No spam. Unsubscribe anytime.
Instructions
- Prep your oven and pans:
- Preheat to 350°F (175°C) and grease three 8-inch round pans, then line the bottoms with parchment paper—this prevents sticking and makes turning out the cakes far less stressful. Take a moment to make sure everything is level so your layers bake evenly.
- Dry ingredients together:
- Whisk flour, baking powder, and salt in a medium bowl until combined. This distributes the leavening agent evenly throughout, preventing random pockets of dense cake.
- Cream the butter and sugar:
- Beat them on high speed for 3–4 minutes until the mixture looks light, fluffy, and noticeably paler—you're incorporating air that will make the cake tender. This step can't be rushed.
- Add eggs one at a time:
- After each egg, wait for it to fully blend in before adding the next one. This prevents the mixture from looking curdled and ensures even distribution of moisture throughout the batter.
- Alternate dry and wet ingredients:
- Add the flour mixture and milk in three parts, starting and ending with flour—this prevents the batter from becoming too thin or too stiff. Mix on low speed just until combined; overmixing develops gluten and toughens the cake.
- Bake with patience:
- Divide batter evenly among pans and bake 25–30 minutes until a toothpick inserted in the center comes out clean. Cool in pans for 10 minutes, then turn out onto wire racks—this stops the residual heat from cooking the bottoms further.
- Make the buttercream:
- Beat room temperature butter for 2–3 minutes until it's pale and creamy, then gradually add sifted powdered sugar while mixing on low to prevent clouds of sugar dust. Once it comes together, add vanilla and milk, then beat on high for 3 minutes until it's smooth and fluffy.
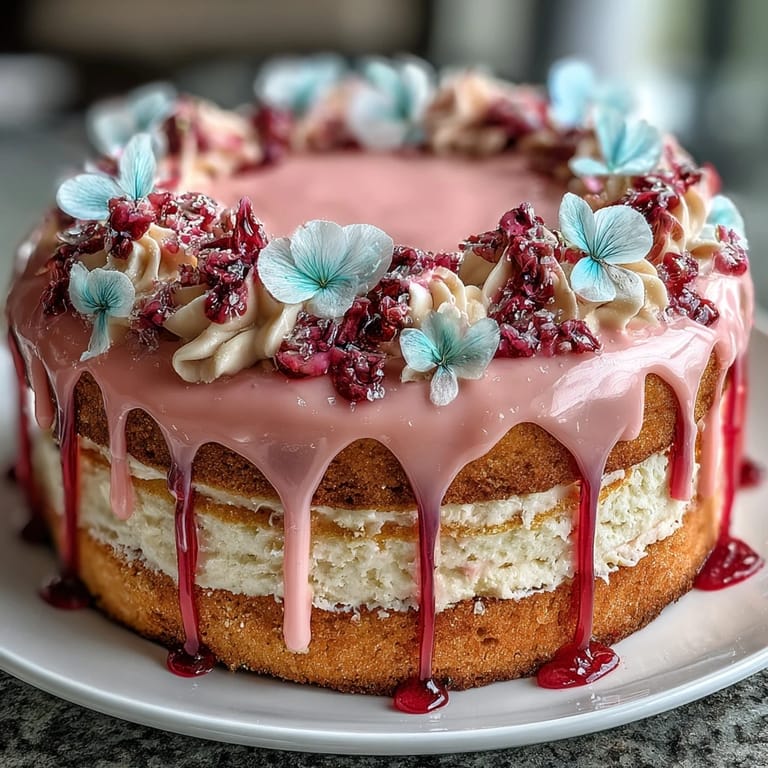
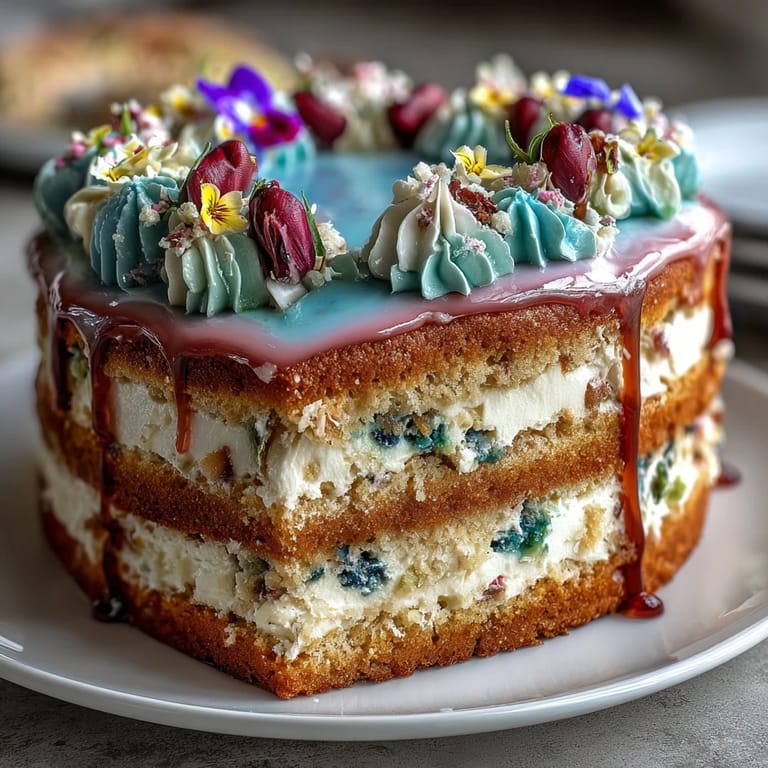
- Create the ombre effect:
- Divide buttercream into four bowls—leave one white and add increasing amounts of gel coloring to the other three to create pale, medium, and deep pink shades. The progression should feel natural, like a sunset.
- Layer and frost:
- Place the first cake layer on your serving plate, spread the darkest pink buttercream on top, then add the second layer and spread medium pink buttercream. Top with the final layer and cover the top with light pink buttercream, then frost the sides with white buttercream for contrast.
- Smooth and blend:
- Use an offset spatula to smooth the frosting, and if you're feeling adventurous, use a bench scraper to blend the ombre colors up the sides for a gradient effect. The key is gentle pressure and patience.
- Decorate and chill:
- Arrange edible flowers on top, remove any non-edible toppers before serving, and refrigerate the cake for 30 minutes so the buttercream firms up and slices cleanly.
 Save
Save I made this cake for my grandmother's birthday last spring, and she cried when she saw it—not because it was perfect, but because it represented everyone gathering around her, celebrating together. That's the real magic of this cake: it's an excuse to show up for the people you love.
The Science of Pink Buttercream
The ombre effect works because you're controlling the concentration of gel coloring across multiple portions of the same base recipe. Gel coloring is superior to liquid because it doesn't alter the buttercream's consistency—liquid coloring adds moisture, which forces you to compensate with extra powdered sugar, changing the texture and taste. I learned this the hard way after my first attempt turned grainy and slightly chalky.
Baking and Cooling Matters
Allowing cakes to cool completely before frosting is absolutely critical because warm cake melts buttercream, and you'll end up with a sliding, messy situation. I've seen people skip this step thinking they're saving time, only to end up scraping frosting off the plate. Set the cooled layers on a cool counter for at least an hour, or wrap them loosely and refrigerate overnight—cold cake is actually easier to frost.
Decoration and Fresh Flowers
The flowers are what transform this cake from lovely to show-stopping, so choose varieties that are vibrant and pesticide-free. If you're sourcing them from a regular grocery store, stick to non-edible decorative toppers that you remove before serving—the uncertainty isn't worth it. Add edible flowers just before serving so they stay fresh and beautiful, and always communicate to your guests which flowers are edible and which are purely decorative.
- Fresh violets and pansies last longer than delicate petals and maintain their color beautifully.
- You can prep the cake a full day ahead, then add flowers just before the celebration starts.
- Keep extra flowers on hand in case one wilts or breaks during transport—accidents happen.
 Save
Save This cake has become my go-to for celebrations because it's achievable, stunning, and genuinely delicious. Bake it with intention, and it becomes a gift wrapped in buttercream and flowers.
Recipe FAQs
- → What creates the pink ombre effect?
The ombre effect is achieved by tinting buttercream in graduated shades of pink and layering them from darkest to lightest on the cake’s tiers.
- → How do I keep the sponge moist?
Brushing cooled layers with simple syrup before applying buttercream helps retain moisture and adds subtle sweetness.
- → Can I use fresh flowers for decoration?
Yes, fresh edible flowers add a vibrant and natural look. Ensure they are pesticide-free and safe for consumption.
- → What’s the recommended way to apply buttercream smoothly?
Using an offset spatula combined with a bench scraper gives the cake clean edges and a seamless ombre blend.
- → How long should the cake chill before serving?
Chilling the cake for at least 30 minutes before slicing helps the buttercream set for cleaner cuts and better presentation.