 Save
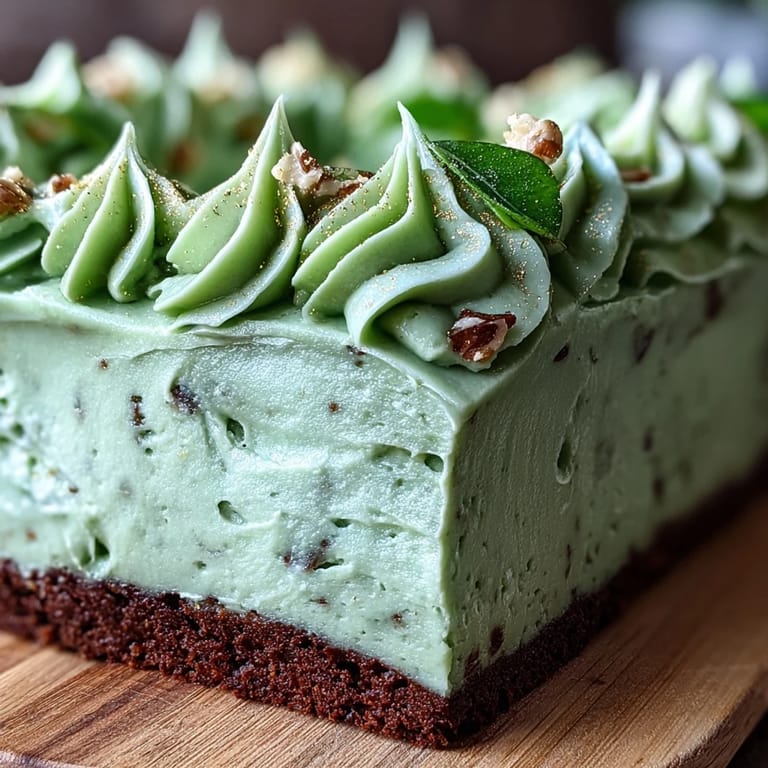
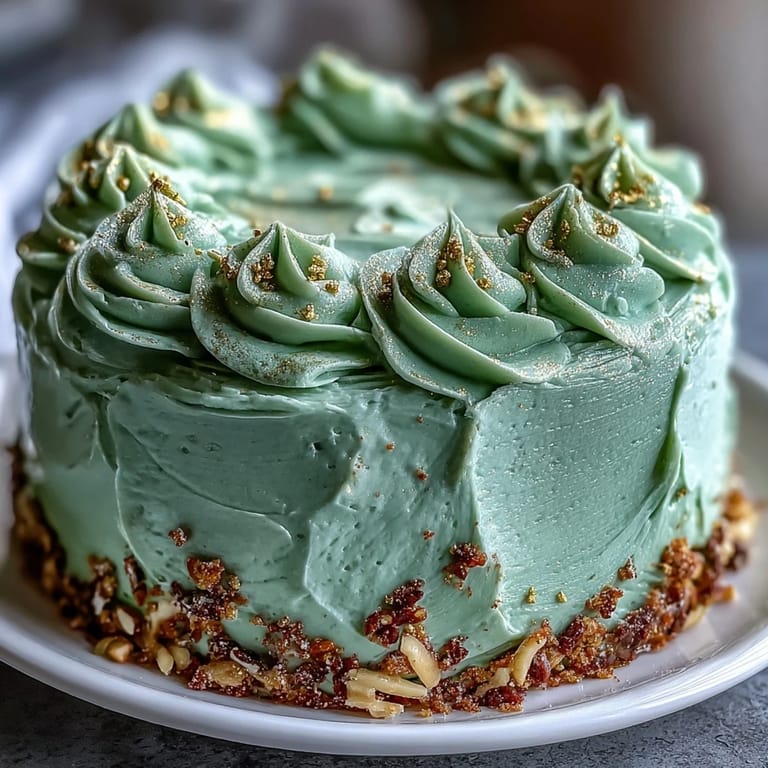
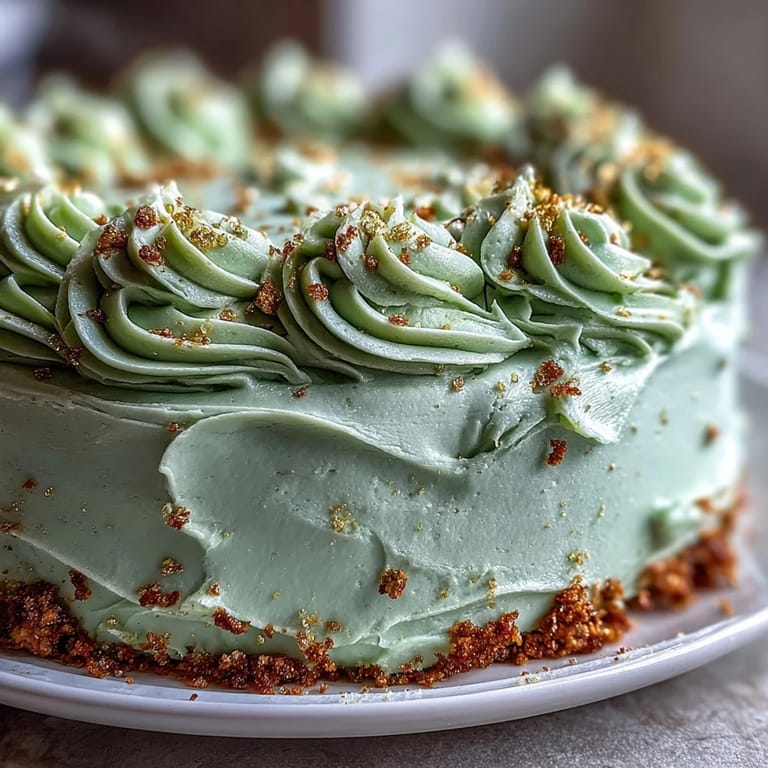
Save The earthy scent of sage green buttercream reminds me of that peculiar calm just before a big event: the kitchen livened up by the hum of the mixer, powdery clouds of sugar in the air, and anticipation thicker than the frosting itself. Something about baking a cake that will help celebrate a milestone—the kind that marks change and new beginnings—makes me want to get every detail just right, from color to crumb. This cake has witnessed a fair share of my nervous pacing and pleased sighs, all while transforming from batter to celebration centerpiece. Even the gold leaf accents catch the afternoon light and seem to shimmer with possibility. It’s a recipe I reach for whenever the accomplishments of a loved one call for a little edible confetti and a whole lot of frosting.
Last spring, my tiny apartment was packed with friends grabbing forks, the clink of plates echoing my own pride as our graduate took the first slice—his grin nearly as big as his accomplishment. I caught myself laughing as gold-swirled icing found its way onto someone’s nose, and for a moment, the air was filled with more joy than frosting sugar. It's that memory—messy, loud, absolutely genuine—that makes this cake a permanent fixture each time there is something to celebrate.
Ingredients
- All-purpose flour: Provides the structure; I always fluff and spoon it into the cup for the lightest cake texture.
- Baking powder: Essential for a tall, springy crumb; make sure it’s fresh for proper lift.
- Salt: A pinch is the backstage hero that deepens the flavors of both cake and frosting.
- Unsalted butter: Room temperature is a must—soft butter makes for the silkiest mix and best buttercream.
- Granulated sugar: Gives the vanilla cake its signature even sweetness.
- Large eggs: Let warming to room temp tame any risk of curdling in the creaming process.
- Pure vanilla extract: The one-step trick to bakery-style aroma and flavor.
- Whole milk: Adds richness and moisture—let it shed its fridge chill for best blending.
- Powdered sugar: The backbone of the buttery, fluffy buttercream; sift for the smoothest result.
- Heavy cream or milk: Adjusts the frosting’s texture to your ideal spreading or piping consistency.
- Sage green gel food coloring: This delivers deep color without thinning the frosting; start with a little and build up.
- Gold edible luster dust: That magical finishing touch—just a tiny dab transforms the whole look.
- Clear vanilla extract or vodka: Used to liquefy luster dust for painting dramatic gold accents.
Tired of Takeout? 🥡
Get 10 meals you can make faster than delivery arrives. Seriously.
One email. No spam. Unsubscribe anytime.
Instructions
- Prep your pan:
- Line and grease your sheet cake pan, smoothing the parchment corners so cake releases perfectly later.
- Mix the dry ingredients:
- Whisk flour, baking powder, and salt in a bowl; watching the flour cloud rise always feels like the official start of baking.
- Cream sugar and butter:
- Beat room temp butter and sugar together just until pale and fluffy—watch for the transformation and have patience.
- Add eggs and vanilla:
- Incorporate eggs one at a time, then vanilla; I always smile at how the batter goes glossy and smooth after this part.
- Combine and finish the batter:
- Alternate adding flour mix and milk, just until blended—avoid overmixing for that perfect, tender crumb.
- Bake and cool:
- Scrape batter into the pan, level, and bake until the center springs to touch; let the cake cool entirely on a rack so the frosting glides.
- Whip the buttercream:
- Beat the butter until it’s soft and dreamy before adding powdered sugar bit by bit; thin with cream until spreadable.
- Tint your frosting:
- Blend in sage green food coloring little by little—you can always add but not take away.
- Frost the cake:
- Sweep the sage buttercream over the cooled cake, enjoying the moment of calm as you even it out.
- Gold accents:
- Mix luster dust with clear vanilla and paint golden swirls or piped details; even small touches make the cake look extraordinary.
- Decorate and celebrate:
- Top as you like with graduation decor, golden sprinkles, or chic piping—let the occasion inspire you.
 Save
Save Watching the guest of honor pause to admire all the celebratory touches—tiny gold stars, a sage green diploma piped in the corner—made all the late-night planning and crumb-sweeping more than worth it. It was one of those rare moments where cake really did say everything I hoped it would.
How to Nail That Sage Green Color
Striking sage isn’t a matter of dumping in green dye but building up the shade in tiny increments—too much and you veer toward neon instead of elegance. I start with a toothpick tip's worth of gel coloring, mix, assess under daylight, and only add more if needed. Often, a pinch of gray or a dab of yellow rounds out the color. These tweaks make a world of difference, and now I keep a napkin handy for quick swatches to test the final hue.
Easy Gold Details Without Fuss
If the thought of painting edible gold makes your hands tremble, know that messy brushstrokes and even finger-dabbed patches look artful and intentional—learned that the day I lost my patience and went abstract. Mixing luster dust with just enough clear extract thins things out for painting, but too much liquid can ruin the gloss. Quick, feather-like flicks give a celebratory sparkle and let you hide any accidental dents in the frosting.
Serving and Storage the Party Way
I’ve found chilling the finished cake for a bit helps it slice into neat, party-ready squares—especially handy when your kitchen is full of eager hands. Cover leftovers tightly since buttercream loves to absorb fridge smells and can dry at the edges if left open.
- If slicing ahead, wipe the knife between each cut for clean layers.
- Take the cake out of the fridge around 30 minutes before serving for the softest crumb.
- Store decorated cake loosely in a cake box for best results and wow factor.
 Save
Save Cake is good, but a cake that celebrates someone’s leap into their next big chapter? Even better. Enjoy every bite—and every story shared around the table.
Recipe FAQs
- → How do I get an even crumb in a large sheet?
Room-temperature ingredients and gentle mixing help. Alternate dry ingredients with milk, folding until just combined, and spread batter evenly in the pan. Bake until a toothpick comes out clean to avoid a gummy center.
- → How much gel coloring is needed for sage green?
Start with a tiny amount of concentrated gel and add gradually until you reach the desired sage tone. Gel colors give stronger pigment without thinning buttercream, so add sparingly and mix thoroughly.
- → What’s the best way to apply gold luster dust?
Mix luster dust with a few drops of clear vanilla extract or vodka to make a paint and brush it onto piped accents. For a softer sheen, fold dust into reserved buttercream and pipe or spread for marbled gold effects.
- → Can I make components ahead of time?
Bake the sheet and cool completely, then wrap and refrigerate up to 48 hours. Buttercream keeps well refrigerated for several days; bring it to room temperature and whip briefly before use. Assemble the day of serving for best texture.
- → How do I slice neat squares for serving?
Chill the frosted sheet until the buttercream firms slightly, then use a hot, clean knife wiped between cuts for clean edges. A bench scraper or long spatula also helps when lifting squares.
- → What flavor swaps work with this base?
Try adding chocolate, lemon, or almond extract to the batter for different profiles. Chocolate chips or a thin ganache layer under the buttercream also pair nicely with the vanilla sheet.